Tuesday, March 22, 2016

2000 Page Views!

Please allow me to humbly thank each and every person who took the time to read my blog.  2000 views may not seem like a lot to some, however it means a lot to me!   When I started, I really had no idea if anyone would be interested in my musings, it was more of a personal log.   I hope that I can continue to provide you with some entertainment, insight and enjoyable reading.


Something I have never really explored before is local motorcycle history.  This is primarily due to the fact that Canada was never a true manufacturer of motorcycles (Bombardier and early Indian production aside) but an importer.  That being said, there are a number of stories, shops and true characters whose stories should be told.  I can relay a few personal reflections from my early dealings with British bike shops,  however these are from the mid 90's and well past the glory days.  I will post about my induction into this world at a later time.

What I would like to do is preserve the memory of what bike shops used to be before the era of box stores and gentrification.  These were neighbourhood establishments were guys could 'BS' at the counter, get advice and feel at home with like minded enthusiasts.  In Toronto there used to be a dozen of these shops, all gone now.   Hamilton has managed to maintain the local shop on King street West, Sturgess Cycle.  I have always had good service there and purchased two new bikes over the last decade.   Poole's Harley Davidson is still on Parkdale but are no longer an official dealer.


I'm going to start the project with Firth Motorcycles, which was located at 1857 Danforth Avenue in Toronto.  Harry Firth was the primary importer of AJS/Matchless, Norton and later Royal Enfield.
 
Unfortunately I will only be able to verify if the G12 was sold there, as the G9 has been built from bits and has a strange serial number that no one can seem to make heads or tails of.  I am fairly confident that my father's Norton Commando basket case came from there, though I would need to check the paperwork (which actually came with the bike for once)

The building is still there, however it is now a bubble tea shop!  When the bike is done, I would like to drive by and pay homage to a piece of our lost motorcycle culture.

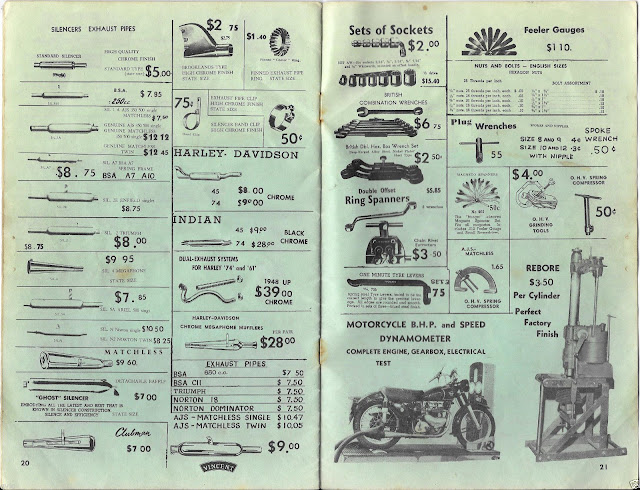
Below, we have a neat vintage advert and a picture of the old shop then and now.


If anyone out there has any literature, stories or photographs I would be very interested in seeing them.  Please feel free to leave a comment below.


Interesting to see the both the Matchless and AJS models sharing the name Globemaster rather than having distinct model designations.  The Globemaster name is new to me, localized marketing perhaps?
Those Prices!  Where is my time machine?  I believe I have a set of the $9.95 megaphones which were salvaged from Kohl's in Lockport.  This ad is the first time I have ever seen them advertised.

An artist's rendition, I hope to find an actual photograph soon. 

As it stands now,  I wonder if the old sign is still underneath?  It looks like the new proprietor just put up a banner.

Monday, March 21, 2016

Blood, sweat and beer..


Good news and bad news.  You can usually expect both when you start working on an old motorcycle.   I got both yesterday when I continued disassembly of the G9 motor.

After removing the pistons for measurement, I wiped them down and saw +060 stamped on the top.  
Unfortunately that is the kiss of death for Matchless cylinders, the absolute limit for boring. 

No point in having them measured now!

I did some research and managed to find one stock bore barrel in England for a good price,  some broken fins but I am certain that can be fixed fairly easily.  Perfection is a bit much to ask for a 65 year old bike.  I also found a NOS cylinder sleeve that would have to be pressed in.  I picked this up as more of a precautionary measure; I would prefer not to have to have this procedure done as it has dollar signs written all over it.  Big ones.  Hopefully another stock barrel shows up (the seller I bought from has his eyes out for one) and we can continue on.

The good news is that the bottom end looks good and rust free, the connecting rods also seem to be free of nicks and cracks.  As I mentioned previously, the crank does spin freely and it will of course need measuring.  I have the second G9 motor to play with as well.  I can take it apart, clean it up and harvest it for spares.  That is my 'practice' motor and will help me better learn how it all fits together.

Should you ever need it,  I found this handy chart to convert mm to ten thousdanths of an inch.

Conversion Chart

 I truly enjoyed the process of removing the pistons and taking things apart.  Cold beer at my side, I was able to focus on the task at hand and dull all the outside thoughts that sometimes distract me.   This may be something unique to someone with ADD, though I am sure it happens to others.  As I struggled to release the long held wrist pins (probably in there for several decades) I noticed a couple drops of blood on the engine casing.   I took another sip and finished the can, wiping my hand on a shop cloth. For the first time in a long while I felt like a motorcycle mechanic.

 I have to say,  It felt damned good.


Monday, March 14, 2016

Perspiration and Inspiration....


One of my goals with the Matchless G9 project is to make use of items that I have sitting around the garage collecting dust.  I really want to challenge myself creatively by using what I have to build something interesting, attractive and authentic.  By authentic I mean in keeping with a period feel, a machine that wouldn't have looked out of place 50 or 60 years ago.

I am on a severe budget this time and have to think on the level of the home engineer or true shed builder.  The budget needs to go to essentials such as gaskets, valves, springs and guides, piston rings (I am hoping just rings)  Main bearing and connecting rod bearings.  I also need to do some powder coating which is more economical than paint.   New tires and tubes will be required, new chains and wiring harness and cables.   Not a cheap enterprise, however the more I can salvage for the build and the more I can do myself will help considerably.

At best this machine is a 'Bitsa' with frame, engine and gearbox all coming from different years and models which are mercifully compatible.  This can be a special with none of the guilt of ruining an original bike.  That being said, my 'No Chop'  policy will still be in effect.

Here is what I have done so far;

1- cleaned up and de-rusted the barrels, tool boxes and clutch basket.  These are ready for powder coating.  I plan on having the bores measured this week.

2- I have ordered some parts,  mostly beat up and well used, I am currently massaging them back into shape.

3- started removing the swing arm tube in order to take the assembly apart.  Lots of sweat involved along with heat and penetrating fluid.  I am about 50% of the way there.

4- Research. Hours poured into reading articles, forums and parts books.  This is the most work of all so far.


Here is a short list of items (off the top of my head and shelves) that I have pulled down that may finally see some use!

1- Bates Headlamp (5 inch?) chrome NOS 1960's  (bought in 2007)
2- Black pillion pad  (I can't remember where it came from or when!)
3- Sparto style Taillight (bought in 2008 for my Triumph, never mounted)
4- Generic steel rear fender (bought in 2007 for a future project)
5- BSA rear wheel- Came with the Matchless, decent shape
6- A10 Super Rocket Fork legs (acquired from Andy who I met and posted about a few years ago here:  Another one gone

7- BSA front wheel- Ebay purchase from a while ago (compatible with the forks I have)
8- 60's era Leonelli switchgear (bought from a bin at the Paris rally in 2013)
9- 1966 Triumph Bars (originals from the 1966 TR6R project bike, my Father bought a NOS replacement set)

10- universal fork gaitors
11-  NOS 1960's/1970's universal mirror
12- Ceriani and BSA top and bottom yokes (not sure if either will work)
13- Bates style solo seat with springs-  I bought this in a parts lot on Ebay a few years back.


Now onto the inspiration portion of the post.  I have been asking myself what I want from this build, what is the vision and does that vision tie into my aforementioned goal?

My tastes run a little on the conservative side, I am the first to admit that.  I believe that British motorcycles are the apex of style, elegance, power and sheer beauty.  These aesthetics, the foundation laid so many years ago are still being imitated by both manufacturers and builders around the globe.  I couldn't imagine pouring heart, soul and wallet into anything less or anything else on two wheels.  The pictures below, pilfered from many different websites are my inspirations for the project.  You will note the similarities, single seat, pillion pad stripped down and lean in appearance.


This one has a fantastic look, simple and elegant, I would forgo the scrambler bars.

This is a concept drawing (not done by me!)  I like the stance, tank and headlight.  swingarm and disc brake are too modern for me.

Lovely as this one is, I chose it primarily for the colour contrast.  Perhaps something bright other than black? I really like the rear mudguard as well.


Other than the rigid frame this one is close (single cylinder engine aside)


Out of all of them, this is my favourite overall.  With a couple tweaks from the other pictures this could be it!


Now to get in gear back at Motocode HQ!  This bike will not build itself.....

Friday, March 11, 2016

Netflix and Chelate...


Rust.  The bane of every mechanic and restorer's existence.  How many times have we excitedly reached for that perfect part at a swap meet only to see that it is badly pitted or unusable?

Being in Southern Ontario this is a reality that is unavoidable;  I have seen some beautiful cars and bikes become scrap after falling victim to our good friend iron oxide.

Over the years I have relied heavily on white vinegar, usually the cleaning type with a higher acid concentration.  I have also used WD40 and steel wool, mainly for cleaning rims, evaporust, Rust remover concentrate (from Lee Valley) and naval jelly.

In past posts I have touched on some of my experiences with these various methods, some good, some less than satisfactory.   Evaporust for example, works well but is very expensive if you have a lot of parts.  Vinegar is fine in the summer if you don't mind the smell, however in colder temperatures it is useless as I recently discovered.

I am very pleased to say that I have found my all time, number one go-to solution from here on out.

Molasses.   Molasses and water.

Though I wish I could take credit for this discovery, I can't.  This has been around for many years, very popular in Australia in particular.   In my aforementioned lean months it was important to my budget to find something that was effective and dirt cheap.   I looked into setting up an electrolytic conversion tank, however I was concerned about leaving a power supply unattended as well as the potential fumes.   I figured it was as good a time as any to give this one a go.

There is no science to start the process,  reports vary on the ratios;  some people say 10:1 water to molasses, others 4:1, etc.   I met in the middle with 6:1.   Initially I just used some grocery store no name brand stuff, $2.99 a carton.  I poured the contents into a big bucket with hot water and dropped my parts inside.  I lost the before picture of my first lot, take my word for it this stuff was caked in rust.  It looked as though I had found it at the bottom of the ocean!  Thankfully I wasn't in a rush for these parts, it took two weeks for things to really clean up.


After, before couldn't make it.


The photos don't these parts justice!  The clutch basket in particular came out like new. (top left corner of the picture)  There was a black film that was scrubbed away with a nylon brush and dish soap; I then sprayed a coat of WD40 to protect from fresh rust.  I was very pleased with the results and decided to invest $30.00 in a gallon of feed grade (the preferred option for those who use this method) from TSC.


The results with this molasses was much more impressive than the grocery store variety.  I have a large garbage can now, filled to the brim with a variety of parts 'Chelating'.  It seems to be working far more quickly this time with results as soon as a few days in.  The added bonus is that this can be dumped onto your garden or safely down the drain when done.  It is actually good for plant growth and is 100% biodegradable.

I won't delve into a scientific explanation here, however I will provide the link below. 


Here are some tips for anyone wanting to try this at home.

1.  It leaves a distinctive odor, not foul per say but not pleasant, outside is better than inside.
2.  Wear gloves when pulling things out of the mixture.  The odor will stay on your hands otherwise even if you wash them a few times.  

3.  Pull your parts out every few days and wipe them down or rinse them off.  This will give the mixture better access to the bare metal.  

4.   When you make your mix, start with hot or boiling water. This will help the viscosity of the molasses and stop it from sinking to the bottom.  Stir vigorously.  I also believe that the reaction to hot water also speeds up the fermentation process.  

Next post I will show some updated pictures and speak more on the Matchless project; 

Have a safe weekend!


Thursday, March 3, 2016

Matchless by Reputation!


So you've decided to buy a basket case.

 You have soul stirringly romantic notions of taking a rusted heap and watching it rise, phoenix like from the ashes.

It is a daunting task, with dizzying highs and sometimes painful lows.  Your free time will evaporate as will your extra cash.

There are few things however that are as satisfying and provide such a strong sense of accomplishment.

Let me show you what I dragged home.


The photos don't tell the whole story as there was quite a bit more buried in boxes and other items.  

Here is the the rough breakdown:

2x Frames (one single downtube, one duplex cradle frame)
2x Carbs  (one monobloc and another, much older Amal)
3 x wheels (2 rears and a front)
2 x Oil Tanks (vastly different shapes)
3 x Toolboxes 
2.5 Engines
2 Front Mudguards
2 Rear Mudguards
1 gas Tank
4 x center stands
2x sidestands
1.5 Gearboxes
3 x Lucas headlights (2 were scrap)
1 x BSA lightning seat
2 x sets of rear shocks
1 x steering damper
1.5 front ends
0.5x wiring harness
3x coils 

Loads of nuts and bolts, frame mountings, odds and ends that I am still going through! 

I confess that I knew very little about Matchless other than the company history before I took this on.  It was evident that I was going to need help and lots of it.   Unlike Triumph and BSA,  AMC motorcycles are a little bit trickier in regards to identifying parts and part numbers.  All the vintage parts books and manuals are available for free online, however I found them challenging to decipher. 

The best solution was to join the owner's club, http://www.jampot.com/default.asp 
They have excellent resources as well as frame identification service, if you are a member you pay five pounds for the service.  Interestingly enough, Matchless and AJS don't have matching numbers as Triumphs do.  The frames, engines and gearboxes all have different numbers!  If you want to ensure that you have a matching unit (as it left the factory) there is a dating officer who can research factory records and provide a report.  


As I typed in the digits I quietly hoped that one of these bikes was a G11;  This was the last bike my father rode in England.   

Drumroll please...

Category
Frame No
Engine No
Gearbox No
Year
Model
Other Information
Road 
A27XXX
(hidden)

1955 
55/20
Engine No., Dispatch date, Test date, Dealer, Testers name 


Category
Frame No
Engine No
Gearbox No
Year
Model
Other Information
Road 
A7XXXX
(hidden)
(hidden)
1960 
60/G12DL
Engine No., Gearbox No., Dispatch date, Dealer, Testers name 


I wasn't surprised by the G12,  the duplex frame, oil tank and side covers looked to be from a later model (the last true Matchless product before the Norton merger)

After joining the Jampot forum, I was told by the gurus that my 2 engines (seen on the bench) were 500cc G9's  however the stamping on one was ground off and the other re stamped with strange numbers.  The experts reckoned that these were early circa 1951 or 1952.  That means the best of the the two will fit the 1955 frame, originally designated for the equivalent AJS model (20).

What to do with the big pile of AMC goodness?  

I have started by separating the G12 from the G9,  something I am still not finished and frankly will probably never fully achieve.  This is due to the fact that many parts were shared among the different range.  That being said, I have managed to get all the major G12 components up in the rafters and put away for future restoration.  I will likely get to it in a few years after some other patiently waiting projects have been completed.  The G12 could use some fresh casings and the crankshaft needs some serious rust removal.  I am told that the 650cc engines were prone to blowing up as they tended to be abused in the day and did not receive proper maintenance.  I have a very kind friend who has offered me a set for postage (he has been working on these for 50 some odd years.).   I intend to put that bike back together to mostly original condition.  

The G9?  I have a frame, 1 complete motor and one parts motor.  I have 2 toolboxes and an oil tank.  
I have spare odds and ends in my garage that have been collecting dust.   I think I have found the blank canvas that I was looking for....