The first one had been bothering me for some time. The right cylinder head had a long since seized spark plug stuck in the threads. This was a very old KLG F.E. 125 which had probably been there for 50 plus years. I started applying PB Blast over a year ago and would periodically take a stab at loosening it up. I decided that it was time for some more radical action!
The first step was to find 4 screws and washers to drill into a thick block of wood. I made sure the washers would seat just below the head of the screws in order to prevent damage.
I then secured the block into a work bench, found the appropriate socket and a large 'breaker' bar. This is a large wrench lacking a ratcheting head.
With the increased leverage, I was able to get it out although I did fight me. I was quite pleased that there were no crossed threads. Now if only I could get those valves out.
The second accomplishment was the polishing of the AJS timing cover. I have started getting better at repairing/cleaning up damaged pieces. I find myself in a zen state while performing the repetitive movement and feeling the change to the surface.
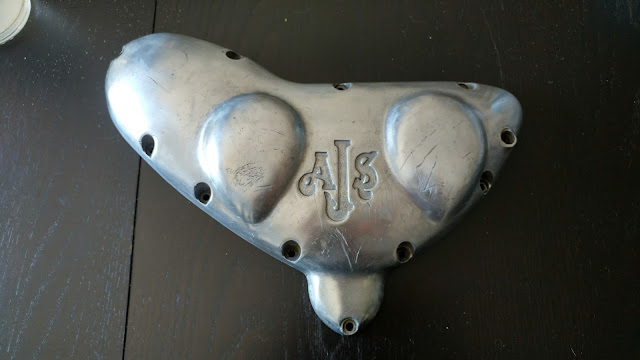
Here is what I started with. The cover had been cleaned up prior, in order to see clearly what needed attention.
The scars ran deep! I imagine a combination of poor storage and having been dropped at least once. While I would be wrong to erase fifty-plus years of character, leaving it this way was a touch too tatty.
I began by putting a small flap wheel on my Dremel multitool. If you lack one of these in your arsenal, I highly recommend getting one. They are great for jobs like these where the work is confined and somewhat detailed. Not to mention the multitude of other hobby related uses. The variable speed option is quite handy as you run a lower risk of gouging the surface material. I start by applying thin strokes over the damaged area, applying no pressure. I let the flap wheel do the work and do it gently. The more uneven the surface, the more work it is to even the surface.
This photo illustrates the piece after much of the grinding had been done. I like to make a few passes over the area to smooth the surrounding out as well. It is always a good idea to run a finger over the surface for feel. I wear a mask, safety glasses and gloves as I don't want to breathe or wear aluminium dust.
Normally I would start sanding with wet/dry emory cloth, starting with 400 grit and working up to 2000.
This time I took a different approach and used a couple of different sanding sponges with soapy water. This worked very well in my opinion, allowing me to cover the whole piece evenly, especially over and around the two humps.
This also saved quite a bit of time as well. I did use a 1000 grit emory cloth for finishing purposes.
At this point, the worst of it had been removed, leaving only minor blemishing that I could live with.
Finally, I took some white compound and polished it out with my bench top buffer/grinder.
Needless to say I am quite pleased with the results! One of the great things about restoring motorcycles is that if a single task meets an obstacle, one can move on to something else while waiting for a solution, part or tool. Small jobs have a magical way of building you up and keeping the spirit of the project alive.
Until next time....


No comments:
Post a Comment